
Affiliate Disclaimer
As an Amazon Associate, we earn from qualifying purchases.
Setting up studio monitors correctly is crucial for achieving accurate and high-quality audio reproduction. Whether you’re a professional sound engineer, music producer, or simply an audio enthusiast, understanding the best practices for setting up studio monitors is essential.
In this comprehensive guide, we will walk you through the process of setting up studio monitors to ensure optimal sound performance in your studio or listening environment.
Table of Contents
ToggleHow to Set Up Studio Monitors
Setting up studio monitors involves a combination of proper positioning, calibration, and optimizing the listening environment. Let’s delve into each aspect in detail.
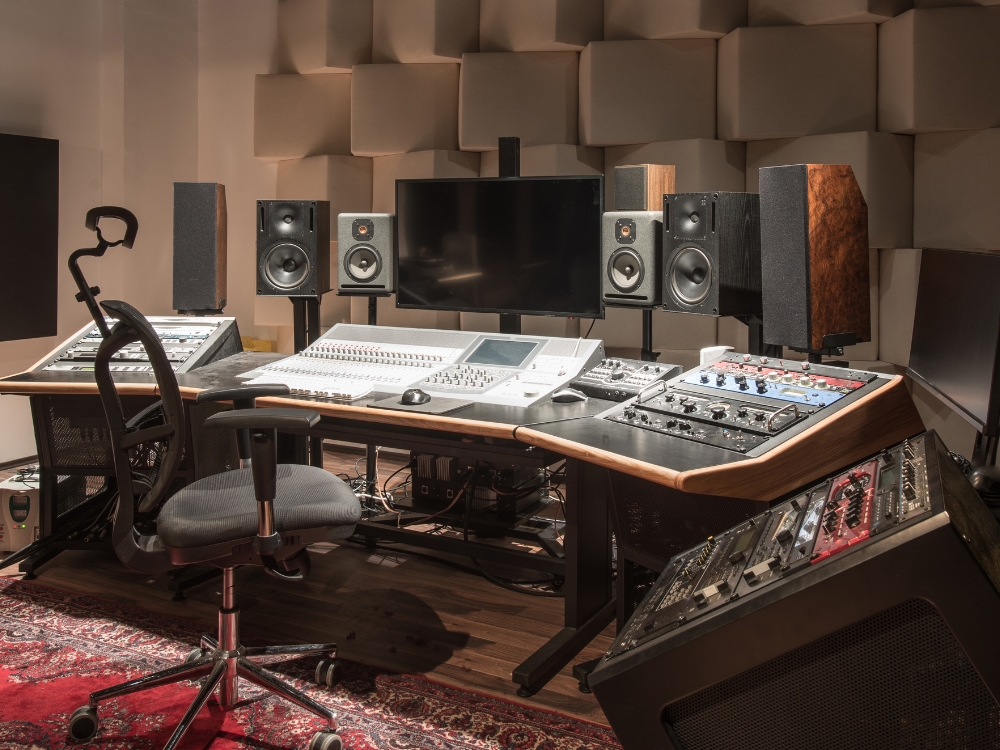
Positioning Your Studio Monitors
Proper positioning of studio monitors plays a vital role in achieving an accurate and balanced soundstage. Follow these steps to position your studio monitors effectively:
Determining the Ideal Listening Position
To determine the ideal listening position, consider the “equal distance triangle” concept. Sit at the center of an equilateral triangle, with the studio monitors forming the other two points. This ensures a balanced stereo image and optimal listening experience.
Placing the Studio Monitors
Place the studio monitors at ear level, ensuring that the tweeters are at the same height as your ears. Position them symmetrically in the listening area, equidistant from the side walls and angled slightly inward towards the listener.
Considering Room Acoustics
Room acoustics significantly impact sound reproduction. Reduce unwanted reflections by adding absorption panels or curtains to control the early reflections from side walls and behind the listener. Experiment with positioning and room treatment to find the best setup for your space.
Calibrating Studio Monitors
Calibrating studio monitors helps achieve accurate frequency response and volume levels. Follow these steps to calibrate your studio monitors effectively:
Setting the Volume Levels
Use a sound pressure level (SPL) meter to measure the volume levels of your studio monitors. Aim for a reference level of around 85 dB SPL at your listening position. Adjust the gain or volume knobs on your studio monitors accordingly.
Adjusting the Frequency Response
Use a reference microphone and measurement software to analyze the frequency response of your studio monitors. Make necessary adjustments using the equalization controls on your monitors or an external equalizer to achieve a flat response curve.
Using Room Correction Software
Consider using room correction software like Sonarworks Reference or IK Multimedia ARC to further enhance the accuracy of your studio monitors. These software solutions can compensate for room anomalies and optimize the frequency response.
Optimizing the Listening Environment
Creating an optimal listening environment involves addressing various factors that can affect sound quality. Follow these tips to optimize your listening environment:
Controlling Reflections
Use diffusion panels or bass traps to control reflections and reduce flutter echoes in your room. Placing acoustic panels strategically on side walls and behind the listening position helps achieve a more accurate and natural sound.
Addressing Bass Traps
Low-frequency issues can be minimized by using bass traps in corners and along wall-ceiling junctions. These traps absorb excessive bass energy and help maintain a balanced bass response.
Eliminating Noise and Interference
Keep your studio monitors away from electronic devices that can cause interference. Avoid placing them near power cables, Wi-Fi routers, or other sources of electromagnetic interference.
FAQs about Setting Up Studio Monitors
What is the ideal distance between the studio monitors and the listening position?
The ideal distance is typically an equilateral triangle, with the listener sitting at the center and the studio monitors placed at the other two points.
Do I need to use isolation pads or stands for my studio monitors?
Isolation pads or stands can help minimize vibrations and improve clarity. They are particularly beneficial if your studio monitors are placed on a stand or near other vibrating surfaces.
Should I position my studio monitors at ear level?
Yes, positioning the studio monitors at the ear level ensures an accurate representation of the sound. The tweeters should be aligned with your ears for optimal listening.
How can I minimize the impact of room acoustics on my studio monitor setup?
Addressing room acoustics involves using absorption panels, diffusion panels, and bass traps strategically to control reflections, flutter echoes, and excessive bass energy.
Do I need to calibrate my studio monitors regularly?
It’s recommended to calibrate your studio monitors periodically, especially if you make significant changes to your room or equipment. Calibration ensures consistent and accurate audio reproduction.
What are some common troubleshooting tips for studio monitor setup?
If you encounter issues with your studio monitor setup, check connections, cables, and power sources. Additionally, ensure that your audio interface and sound drivers are up to date.
Final thoughts 💭
Setting up studio monitors is a crucial step in creating an accurate and immersive audio experience. By following the guidelines outlined in this comprehensive guide, you can optimize the positioning, calibration, and listening environment for your studio monitors.
Remember to periodically recalibrate and experiment with different setups to find what works best for your specific space. Enjoy the true potential of your studio monitors and elevate your audio production or listening experience to new heights.
- Experts Interviewed
- Customer Value
- Top Rated Products
Tips and Tricks to enhance your studio monitor setup💡
Invest in Quality Cables : Use high-quality cables with good shielding to minimize interference and ensure a clean signal transfer between your audio interface or amplifier and the studio monitors.
Avoid Placing Monitors Near Walls: While it’s important to position your studio monitors away from walls to reduce reflections if you’re working in a small room, try to leave some space between the monitors and the walls to minimize bass buildup and phase cancellation.
Experiment with Monitor Placement: Don’t be afraid to experiment with different monitor placements within the recommended guidelines. Small adjustments in distance or angle can sometimes make a significant difference in the soundstage and imaging.
Take Regular Breaks: When working on audio projects for extended periods, it’s essential to give your ears a break. Prolonged exposure to loud sound can cause ear fatigue, making it difficult to judge the audio accurately. Take short breaks and allow your ears to rest.
Use Reference Tracks: To calibrate your ears and evaluate the accuracy of your studio monitors, listen to reference tracks that you are familiar with and trust. These tracks will help you identify any deficiencies in your monitor setup.
Consider Room Measurements: If you’re serious about achieving precise sound reproduction, you may want to invest in a measurement microphone and software to analyze the frequency response and room acoustics. This data can guide you in making informed adjustments to your setup.
Keep the Studio Clean: Dust and debris can accumulate on the speaker cones and affect the performance of your studio monitors. Regularly clean the monitors using a soft cloth or brush to ensure they function optimally.
Avoid Overloading the Monitors: Studio monitors have their optimal range of operation. Pushing them too hard by playing music at excessive volumes or driving them with a power amplifier that exceeds their capabilities can lead to distortion and potential damage.
Consider Room Treatment: If you’re working in a dedicated studio room, consider investing in professional room treatment solutions, such as diffusers, bass traps, and acoustic panels. These treatments can significantly improve sound quality by controlling reflections and resonances.
Trust Your Ears: While technical guidelines and measurements are valuable, ultimately, your ears are the best judge of sound quality. Trust your judgment and make adjustments based on what sounds best to you.
By following these tips and tricks, you can further optimize your studio monitor setup and ensure accurate and enjoyable audio reproduction. Remember, every studio environment is unique, so don’t be afraid to experiment and fine-tune your setup to suit your specific needs and preferences.
Enhance Your Monitoring Experience: Must-Have Accessories for Studio Monitors
Automate Your Studio Monitor Shutdowns and Save Energy

Reduce Vibrations and Improve Sound Quality

Protect Your Monitors from Vibrations and Enhance Performance

Keep Your Studio Environment Clean and Free of Dust and Allergens

Ensure Accurate and Consistent Sound Across Different Playback Systems


